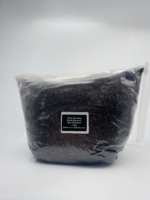
This convenient and easy to use grow kit is incredibly popular amongst those of us just starting out on our mycological journey. This bag removes the need for the researcher to mist of fan their project, removing the likelihood of contaminating your project by over-interacting with it and making the process an automatic one.
If you’re tired of the processes of growing and want a simple, easy to use mushroom grow bag, this product is for you! No need to fan, or mist, the bag does all of the work for you. You should be looking at 27-35 days to harvest although growing is very much an organic process, so your mileage may vary. This really is a top quality UK mushroom grow bag.
The bag itself allows your spores to germinate and fruit within one contained environment. But don’t worry about your project suffocating as gas exchange is taken care of by an extra large filter patch. The self-healing injection port acts as the bouncer to your club, allowing the spores to be injected without any of the nasty bacteria which contaminates your projects.
If you struggle with growing your mushrooms, getting the fanning/misting right or don’t feel the need for all this extra equipment for your one project- the inject and forget bag is for you!
What You Will Receive
You will receive a 4lb inject and forget bag with oxygen release agents, alongside an alcohol swab FOR WIPING THE SYRINGE PORT ONLY.
What You Will Need
Prior to starting this process, please be aware that you will need a heat mat with a thermostat set to 26-27c to ensure your bag colonizes and fruits. You will also need 20ml of spore solution. We would also recommend our Ultimate All in One Incubation and Fruiting Chambers, or something resembling it, to ensure you lock the heat and humidity within your project.
Please make sure you have access to proper lighting for your project. A dim light source around 4500k-6500k would be recommended, however standard room lighting and indirect sunlight works perfectly. You must have a large easy glide bag sealer prior to harvesting your first yield. Our bags are capable of multiple flushes, and by leaving your bag open you’re inviting contaminants in to kill off your 1-4 remaining yields.
What You Shouldn’t Do
Do NOT sterilize the needle via heat or alcohol. Your needle is NHS grade, meaning any attempt at further sterilization will most likely contaminate your needle and your project.
Blocked needle? Do NOT remove it from the injection port. Simply pull your needle back a tiny bit and press harder on the plunger.
Do NOT peel off the plastic surrounding the injection port. It is an additional layer of protection to prevent contamination entering your bag.
Do NOT open the bag until you want to harvest. The bag is a fully sealed unit capable of keeping contamination out and moisture in.
What To Do
Connecting your syringe to your needle
Open the end of the needle packet and then unscrew the black syringe lock tip from the syringe and screw the needle in it’s place. Make sure you leave the plastic protective cap on the needle until you’re ready to use it.
Injecting your spores into the bag
Do NOT wipe/heat your needle. Use the included alcohol swab to wipe down your injection swab.
Remove the protective needle cap and push the needle into the black injection port on the bag. Push on the plunger to inject the solution into the bag. Remove the needle and replace the needle cap.
Take at least five minutes to mix the substrate and break up any clumps to ensure an even distribution of your spores within the substrate. Do NOT open the bag. If you don’t evenly distribute the contents of the bag, this will leave a section with no life and this will delay your project and you may need a secondary shake to aid with colonization.
When the substrate is all mixed up, lay the bag horizontally on it’s side and shake the bag to evenly level the substrate. The bag should look like an elongated tent. Do not compress the substrate, as it should be all broken up and airy.
How to Colonize the Substrate
Ensure you have set up your heat mat between 26-27c degrees with the temperature probe taped down to the middle of the mat, on the black plastic. Place your bag directly on top of this probe, so that it lies in the middle of it.
To help aid colonization, you could use one of our Ultimate All in One Incubation and Fruiting Chamber’s. Alternatively, you could use a small storage holes and melt/drill holes into the sides to make you a mini incubator. An incubator helps to keep temperatures stable within your project, whilst maintaining air flow through small air holes.
Do not enclose the inject and forget bag in a sealed box as the bag must be allowed space to expel the moisture and gasses that build up via the air filter. Evaporation within the bag will depend on the filter patch’s ability to breathe.
Keep the bag in the dark until it is dully colonized and ready to fruit. Your substrate will be completely white, and harder than before. Be patient whilst waiting for the mycelium to appear, it can be delicate at stages.
If you didn’t mix the spores into all the substrate well enough you may see barren patches. Most of the time these areas will be colonized by the mycelium. It can be common for a small patch of substrate to remain uncolonized by the filter patch. This shows that the evaporation and breathing process of the inject and forget system is working well. If you have barren areas at 3-4 weeks after injection you can break all the substrate up again and re-mix. Full colonization should be complete 5 days after.
If the temperatures and conditions are correct, full colonization should take as little as two weeks to occur. If the bags are kept too warm, too cold or cannot breathe properly, full colonization of the bag may take up to 5-6 weeks longer. Please get in touch if your bag isn’t processing like you’d like and we’ll be able to advise you properly.
How to Fruit
After colonization, you are able to fruit! To start this process, introduce your bag to the light! Maintain a 12 hour day:night cycle, but ensure you continue to keep your project on the heat mat at 26-27c. Make sure the light source isn’t too bright. Low light will always work best.
After 10-20 days in the correct environment you will start to see little pins forming along the sides of your cake. These tiny dots are the mushroom pins that will grow into big, healthy mushrooms.
Please be aware that spore strains do take various times to grow, so please be patient. The organism you care for within this bag has to do it’s job in the correct conditions through time.
Repeat Flushes
If you wish to receive repeat flushes from your bag an easy bag glide slider stick is needed.
Turn on the cold tap (preferably in the kitchen- not the bathroom) and add enough water to the bag so the mushroom substrate loaf sits in 1 inch of water. The chlorine in the water actually helps cleanse the loaf whilst it takes it’s little bath. Seal the bag up and leave it for 12 hours, then drain for 30 minutes at an angle.
Close the bag with your sealer stick and place back into it’s fruiting conditions. It should take a similar amount of time for the subsequent flushes to show.
Don’t Miss Out!
Why not give Shiny Spores a follow!
Disclaimer
Please note that it is illegal to grow magic mushrooms within the UK. We ask that you do not use these spores to grow mushrooms, but instead use them to study under a microscope. We cannot be held liable for any illegal use of these spores. Please check your local regulations as we cannot be responsible for the laws you should follow in your own country.
Jenny –
I bought this with the golden teachers and it really was inject and forget. It all worked first time and communication was amazing thank you so much
John Redmond (verified owner) –
Excellent product, arrived very quickly, easy to use full instructions provided, communication spot on, couldn’t be happier , will defo be coming back for more.
robertbramley95 (verified owner) –
these bags are so easy to use and maintain. no mess no stress I will definitely be coming back. There customer service is incredible any questions just ask and they will get bk to you within the same day. Amazing
Dean (verified owner) –
At first I didn’t think I would get my goods. I emailed Scott and he reassured me my items would be posted and sure enough they did arrive. All safe and really well packaged .just waiting for the magic to happen. Will be using shiny spores again in the future
R B (verified owner) –
Arrived this morning, very happy 🙂
Tyler (verified owner) –
Arrived today can’t wait well packed
chrisadams.bmw (verified owner) –
My 4lb inject and forget grow bag arrived with the spores I ordered very quickly. The grow bag and it’s contents really are of the highest quality ! The packaging is also excellent and the attention to detail is plain to see.
I was kept informed of my orders process and a DHL tracking number was provided when despatched. Big thank you to Scot for all the advice and help. I will defiantly order again.
Chris.
Ryan (verified owner) –
Amazing product and great customer service. Perfect for beginners or mushroom enthusiasts. Follow the step buy step guide and you will be flushing in no time.
Antony Steer (verified owner) –
Ecxelent product, does wat it says in the description. Great customer service too
Mark Tylney (verified owner) –
Purchased with a spore kit and heat mat, all items exceded my expectations in terms of quality and simplicity of use.
First class packaging and delivered on time as well, will definitely purchase from this seller again ..🙂..
Edward Rawson (verified owner) –
Perfect results
hexichairyboy (verified owner) –
Straight forward easy to use great customer service as well